
Adding Pockets to the Alpha Raglan Hoodie
The Alpha Raglan Hoodie is designed as a lightweight, high-performance layer, originally intended for Polartec Alpha Direct—a specialty fabric known for its exceptional warmth-to-weight ratio. While this fabric is incredibly breathable and insulative, it isn’t the most durable, which is why many makers are opting for sturdier fabrics like Polartec Power Grid and using the hoodie as a midlayer.
One common request for this pattern is adding pockets. While the original design keeps things minimal, integrating pockets is an easy modification that enhances functionality without compromising performance. Below, we’ll cover two simple pocket styles:
- A kangaroo pocket sewn to the front panel – a classic hoodie pocket that’s easy to add and works well with stable knit fabrics.
- Inseam pockets integrated into a side panel – a sleek option that maintains a clean front and works well when using a contrast fabric for the side panels.
Both methods require slight pattern adjustments, and we’ll cover construction techniques to ensure durability, especially when working with knit and high-pile fabrics.
Option 1: Kangaroo Pocket
A kangaroo pocket is the simplest option and provides a roomy, accessible storage space. With careful sewing, the kangaroo pocket can be added to an existing garment.
DownloadDownload the pocket pattern and select the size that aligns best with your garment. Seam allowances are included in the pattern. You can adjust the size based on preference.
Instructions
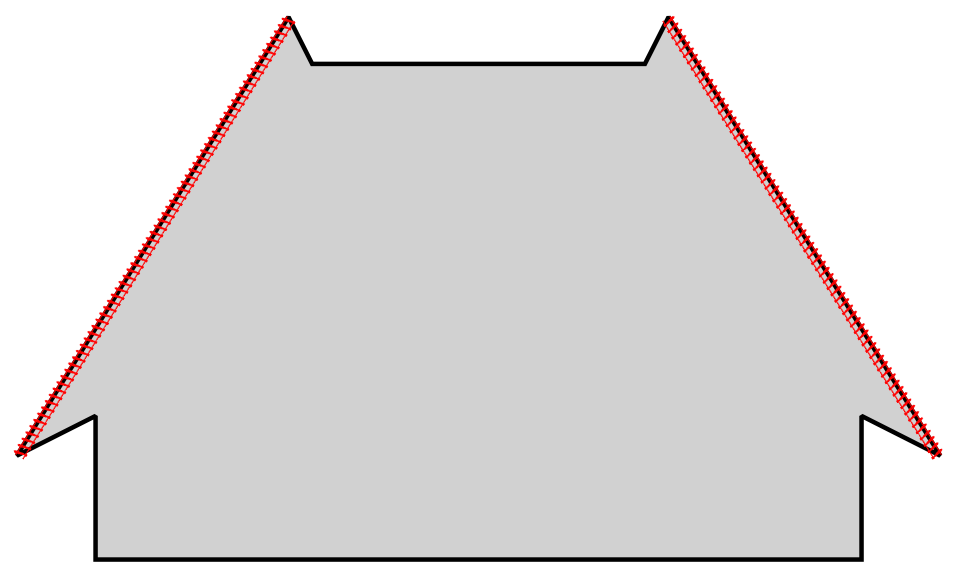
1. Begin by finishing the diagonal edges of the pocket with a zig zag or overlock stitch. Disable the knife if using a serger.
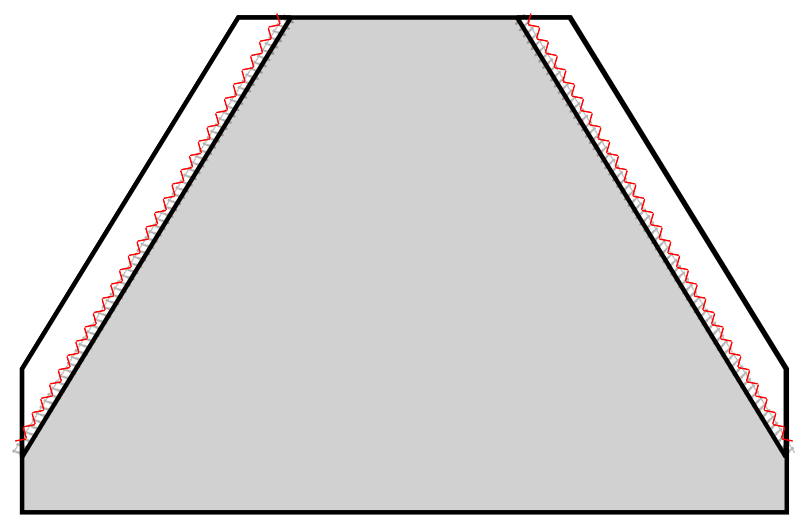
2. Fold the diagonal edges of the pocket to the wrong side by 1" (25mm). Pin to hold the fold in place. Using a zigzag stitch, topstitch along the edge with a 7/8" (21mm) seam allowance (S/A) to secure.
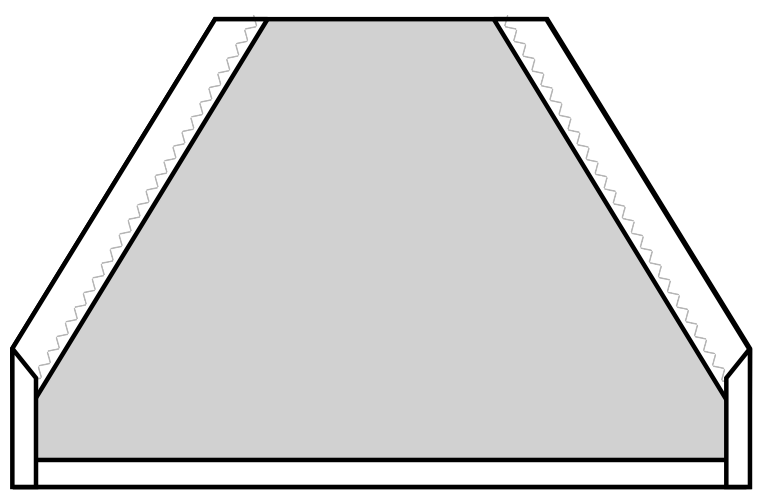
3. Fold the bottom edge and both short sides of the pocket to the wrong side by 1/2" (13mm). Pin or use basting tape to keep the folds in place for sewing.
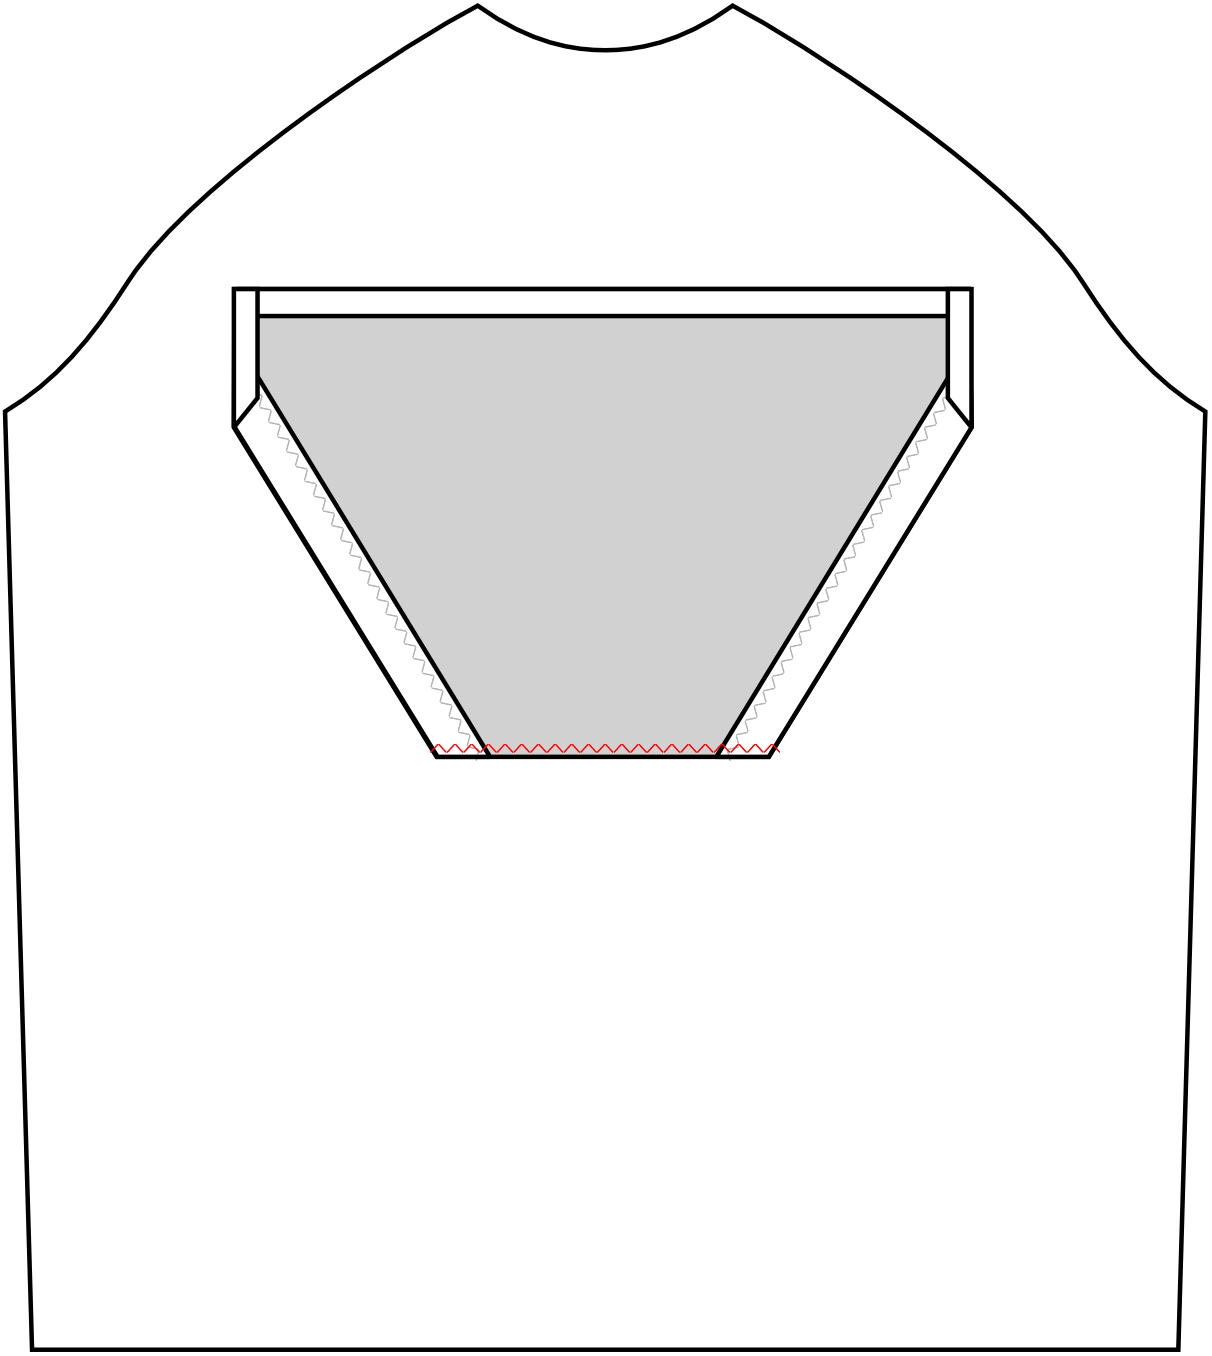
4. Place the pocket on the right side of the FRONT piece, making sure it is centered and positioned 2" (5cm) above the bottom edge. Flip the pocket upward along its top edge so the right sides of the pocket and FRONT are facing each other. Sew the top edge of the pocket to the FRONT with a 1/2" (13mm) seam allowance.
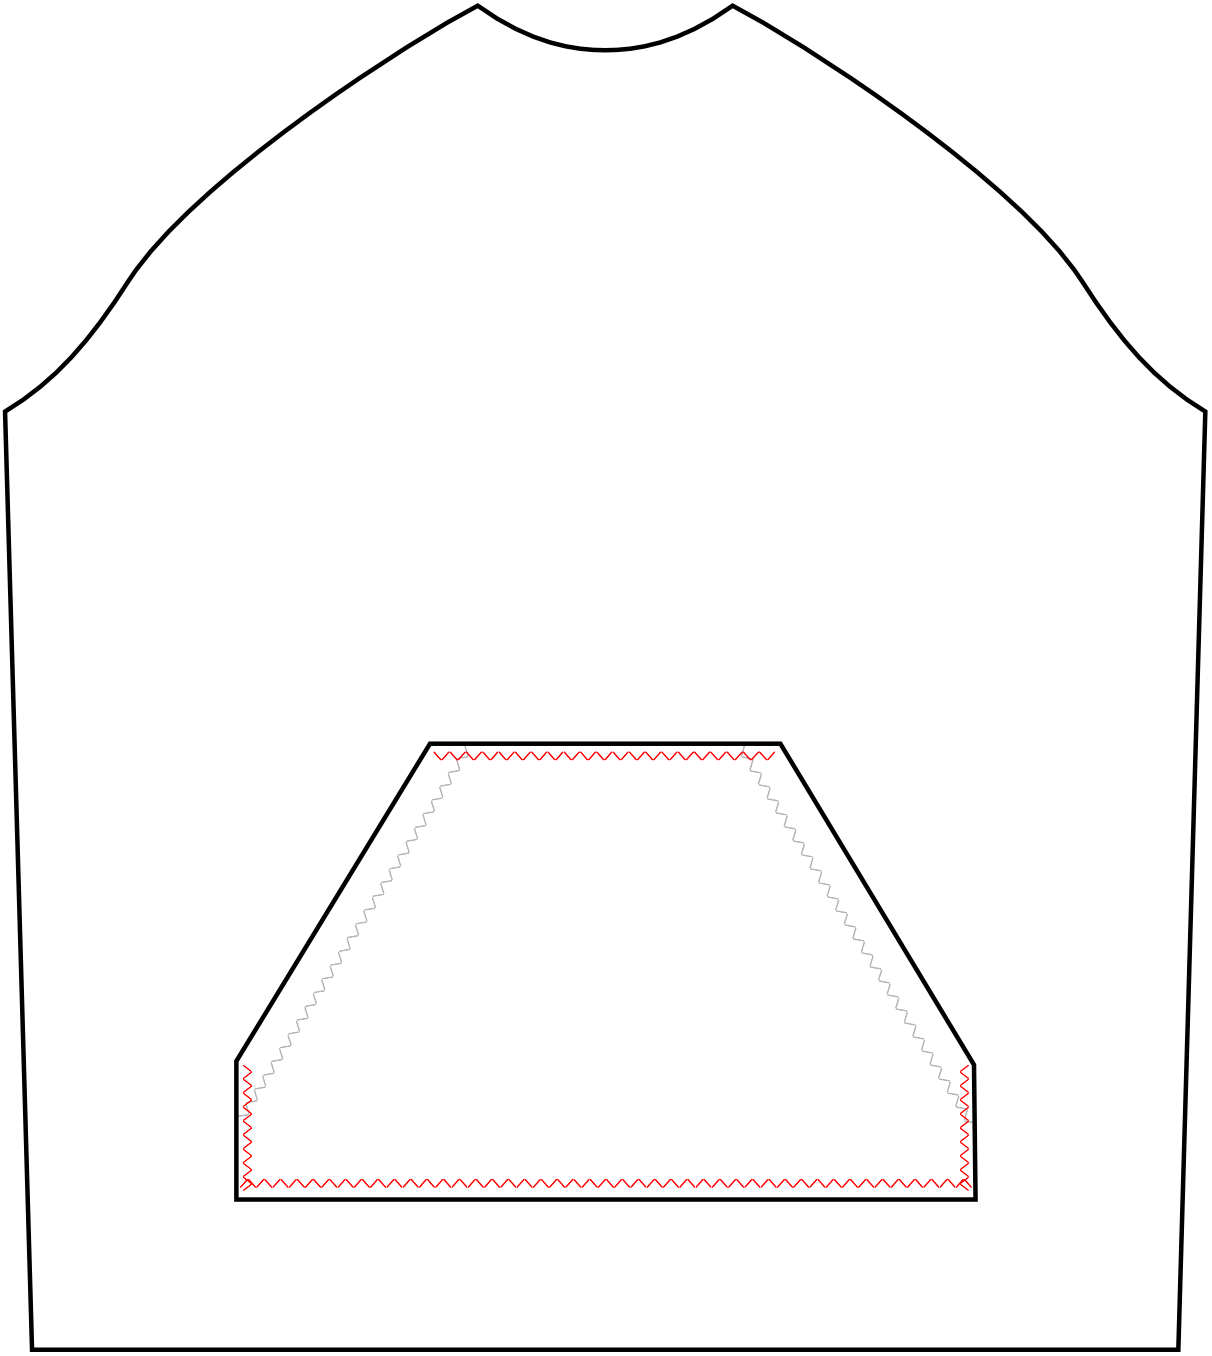
5. Flip the pocket down into its final position. Topstitch along the top, bottom, and both short sides to secure the pocket to the FRONT, using a 3/8" (10mm) seam allowance. Leave the diagonal sides unsewn—these will be the pocket openings.
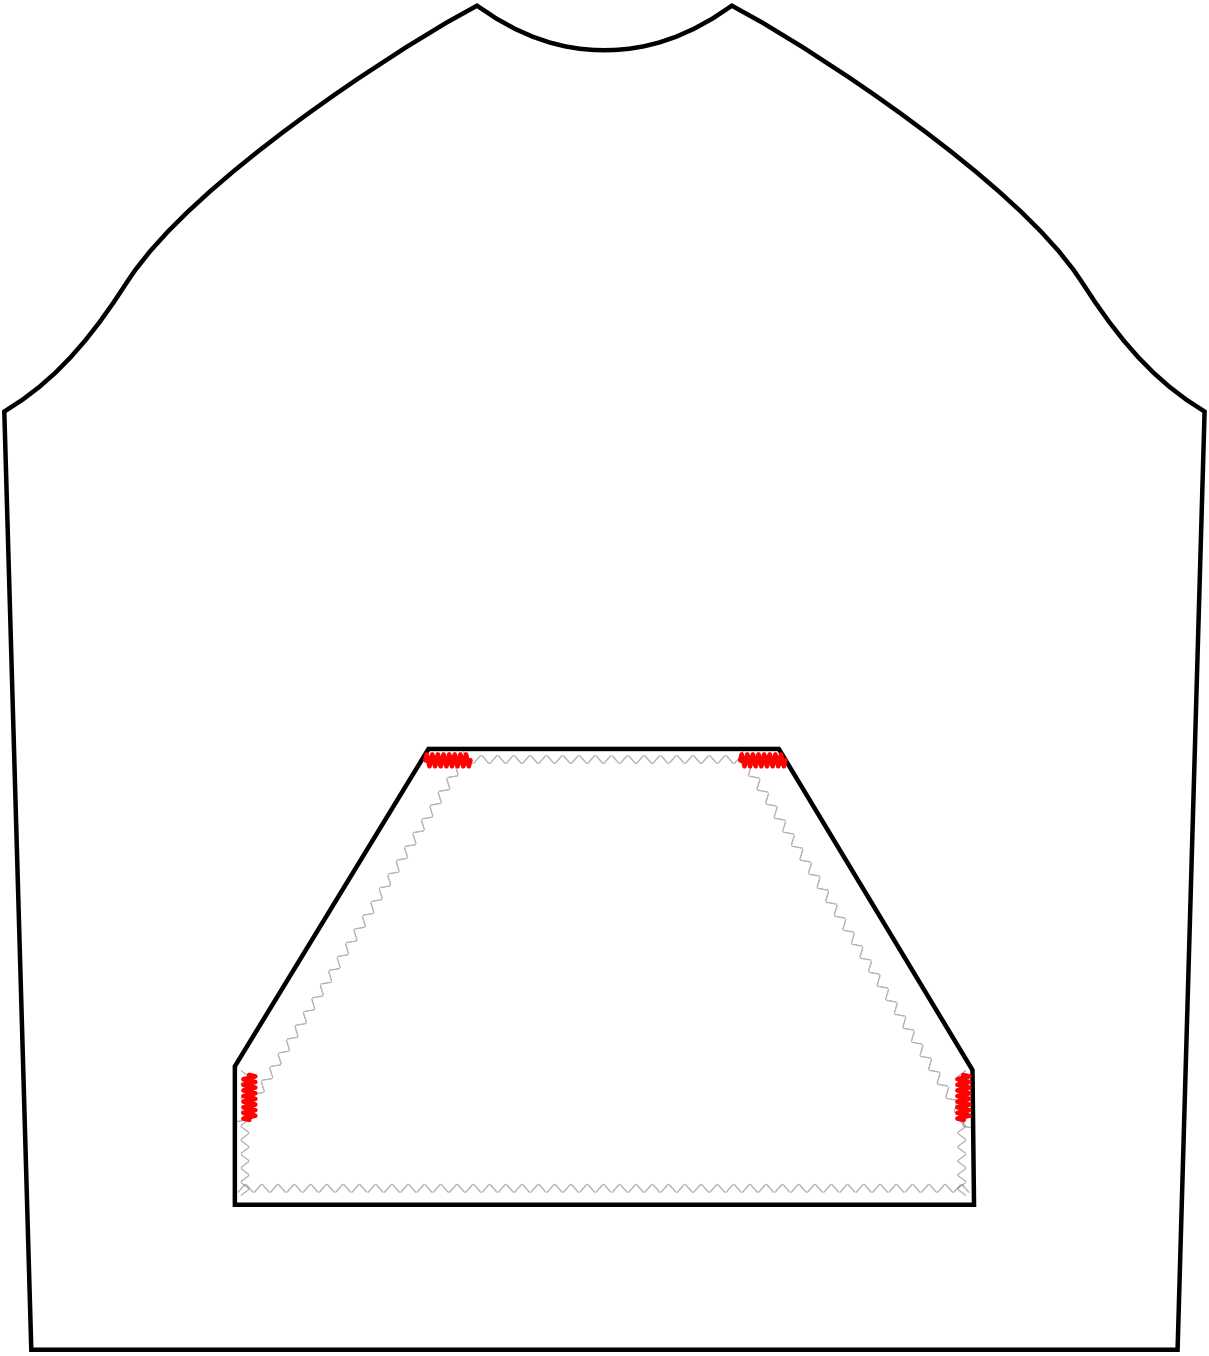
6. To strengthen the pocket openings, sew short bartacks at the top corners where the diagonal edges meet the FRONT. This prevents stress on the fabric and keeps the pocket secure.
Option 2: Inseam Pockets with Side Panels
For a streamlined look, inseam pockets can be added by modifying the front panel to include side panels.
DownloadDownload the inseam pocket pattern. Seam allowances are included in the pattern. You can adjust the size based on preference.
Instructions
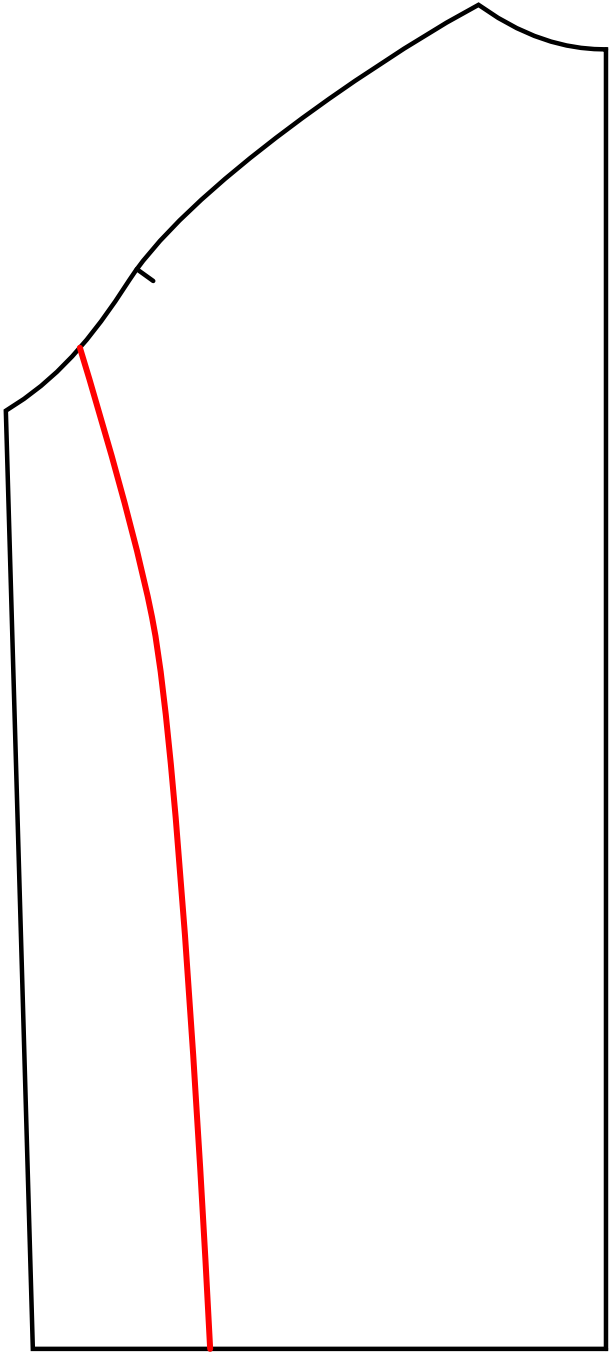
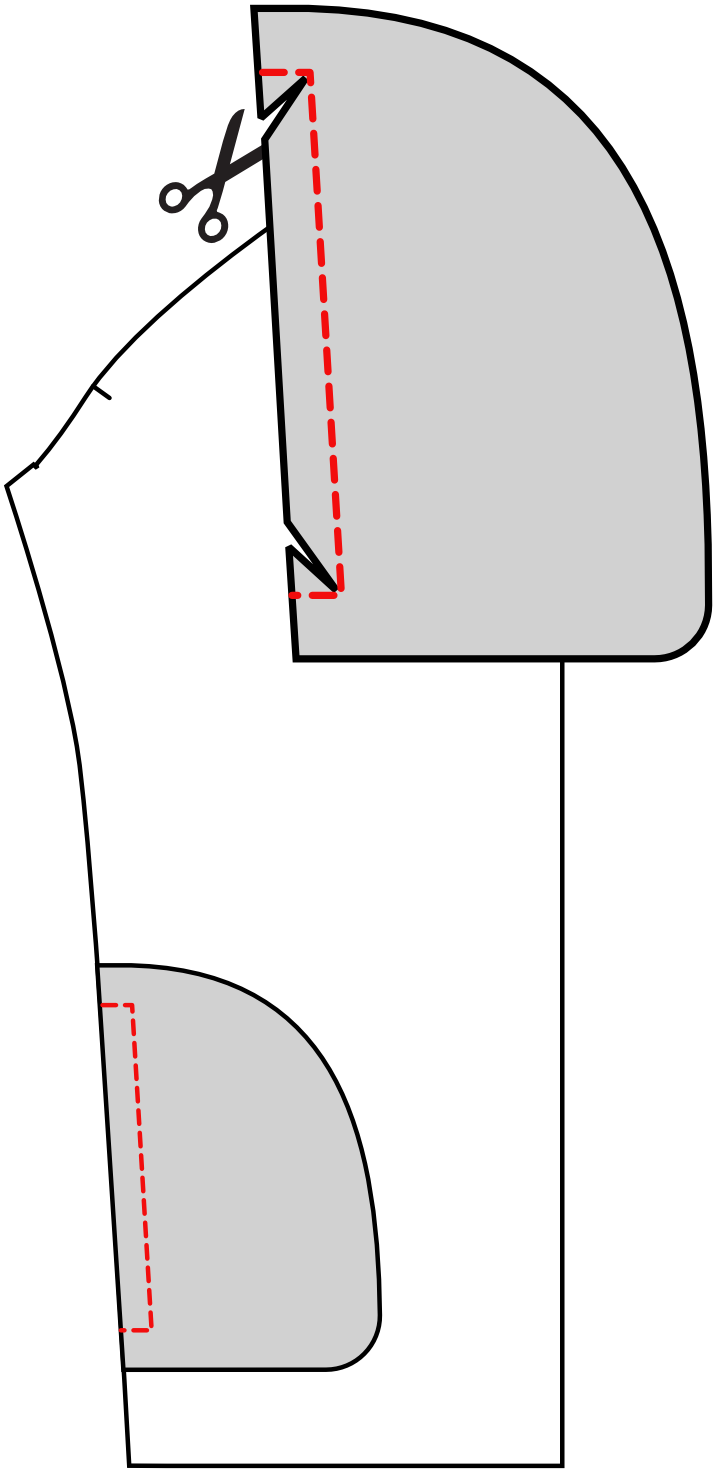
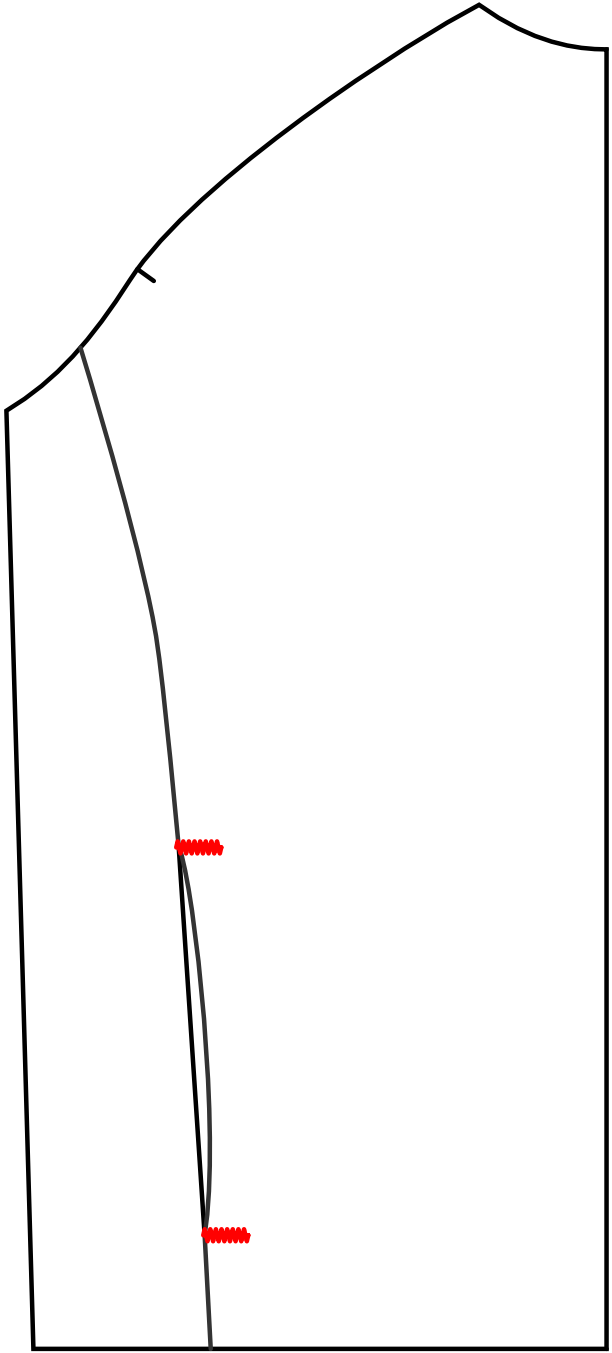
1. Draw a side panel by cutting a 2-2.5" (5-6.3cm) strip from FRONT curving slightly into the raglan seam. This will create a seam for the pocket. Save the cut-off section, as it will become your side panel.
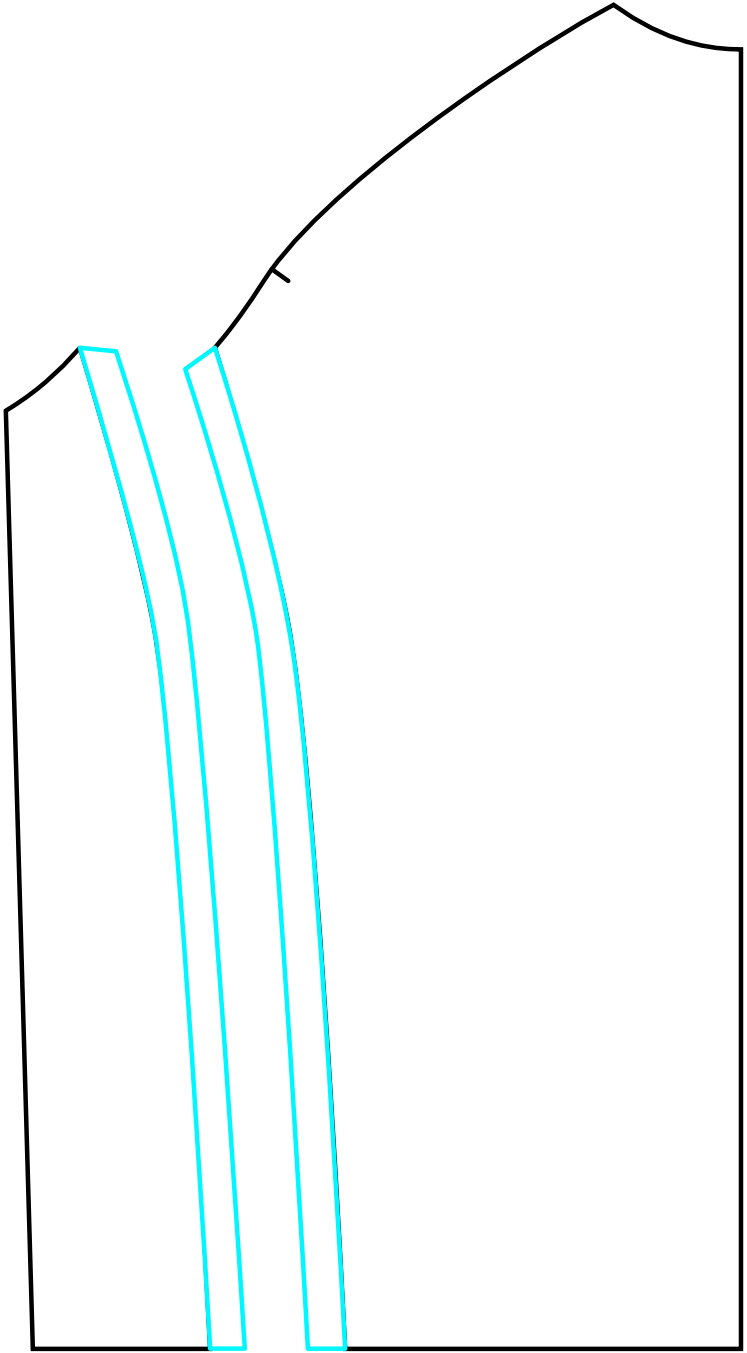
2. Add a 3/8" (10mm) seam allowance to both FRONT and the new side panel along the cut edge. This will ensure the pieces fit together properly after sewing. Cut FRONT on fold and two side panels from fabric.

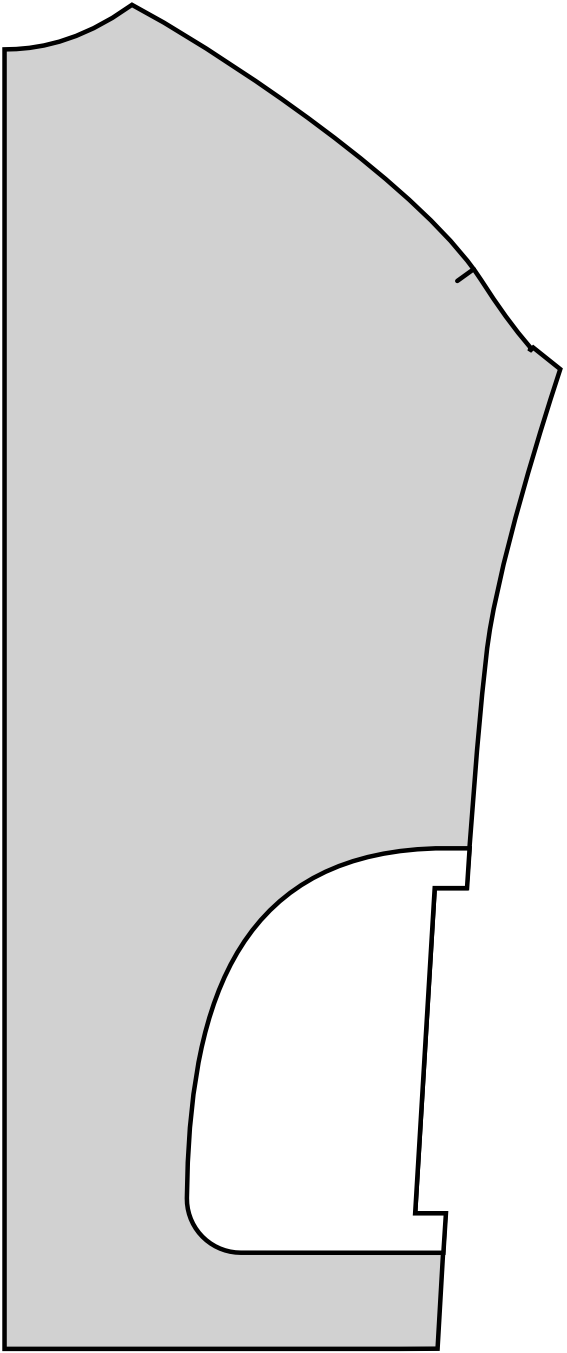
3. Mark a pocket placement line about 2" (5cm) above the bottom hem. Review the pocket shape and placement and adjust for your preferred fit. Cut two mirrored pairs of pocket linings, four total.
4. With right sides together (RST), align one pocket lining with the FRONT piece at the marked placement. Sew a rectangular stitch 6" (15cm) tall using a 3/8" (10mm) S/A, sewing in one notch and out the other. Clip into the corners at a 45-degree angle, cutting both fabric layers, being careful not to cut the stitches.
5. Turn the pocket lining to the wrong side of the FRONT piece. Gently finger press the corners to smooth out any puckers for a clean finish.
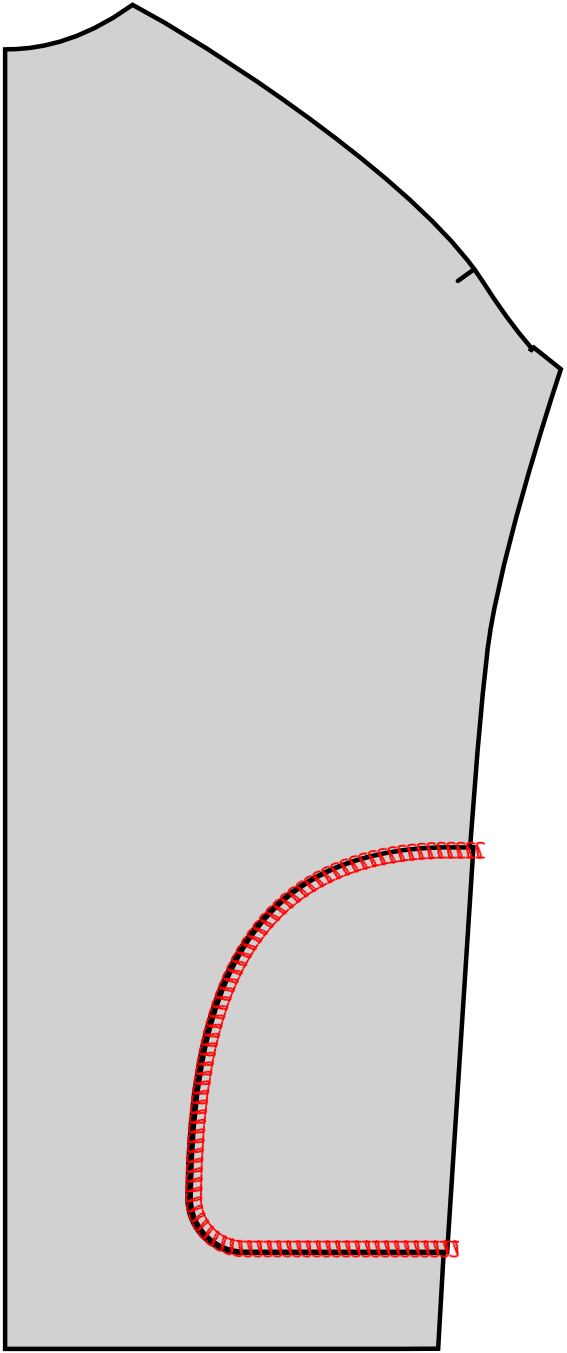
6. With RST, align a second pocket lining on top of the first. Move FRONT away and sew around the curved edge to fully enclose the pocket bag. Finish the raw edge with a zigzag or overlock stitch to prevent fraying.
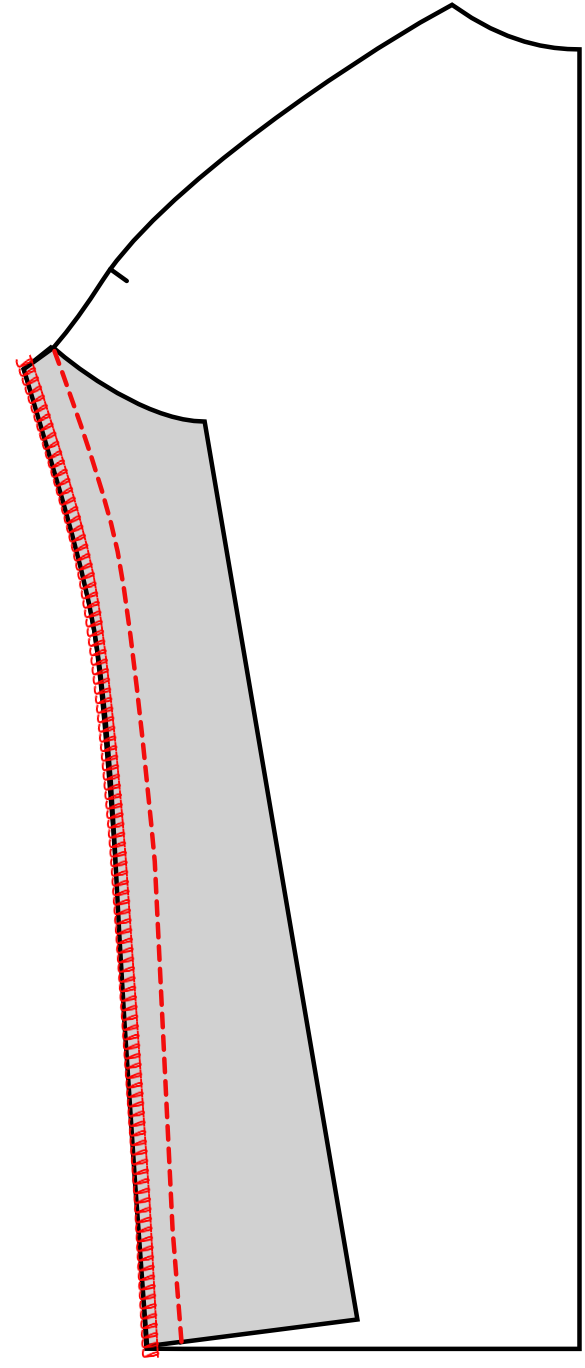
7. With RST, align the side panel with FRONT and sew using a 3/8" (10mm) S/A. Take care to avoid stitching the pocket closed!
8. Press the seam open and sew short bartacks at the top and bottom of the pocket opening to reinforce and prevent stress on the fabric.
Final Thoughts
Adding pockets to the Alpha Raglan Hoodie is a straightforward customization that adds versatility while keeping the clean, minimalist aesthetic. Whether you prefer the easy-access kangaroo pocket or the more discreet inseam pocket, both options integrate seamlessly into the pattern. With the right finishing techniques, you can ensure durability and a professional look, even when working with performance fabrics.

If you're interested in taking this pattern even further, check out Delaney's post at Salt Lake Sewciety. She's put together a fantastic tutorial on converting the Alpha Raglan Hoodie into a full-zip jacket — another commonly requested hack! This mod also includes inseam pockets secured with zippers and is a great option for those looking to customize their hoodie even more.
Happy sewing! Let me know if you try any of these modifications—I’d love to see your projects.