pattern alterations in progress

Modifying DIAS for a Curvier Fit

Advanced pattern adjustments for the perfect fit

The DIAS shorts are designed with a relaxed, straight fit. However, with a few strategic modifications, you can easily adapt the pattern for a curvier fit with more room through the hips and thighs. Since extensive fit adjustments may take a few tries to perfect, it’s highly recommended to make a wearable prototype (toile) using fabric that closely matches the weight and stretch of your final garment.

This guide walks you through common fit adjustments, from simple tweaks to more advanced pattern modifications. Each modification can be done individually to tailor the fit to your specific body shape, ensuring a fully customized and comfortable fit.

Basic Fit Adjustments

These adjustments are included with the pattern and are ideal for refining the fit of the sizes as drafted. For those with a more rectangular body shape, additional modifications may not be necessary.

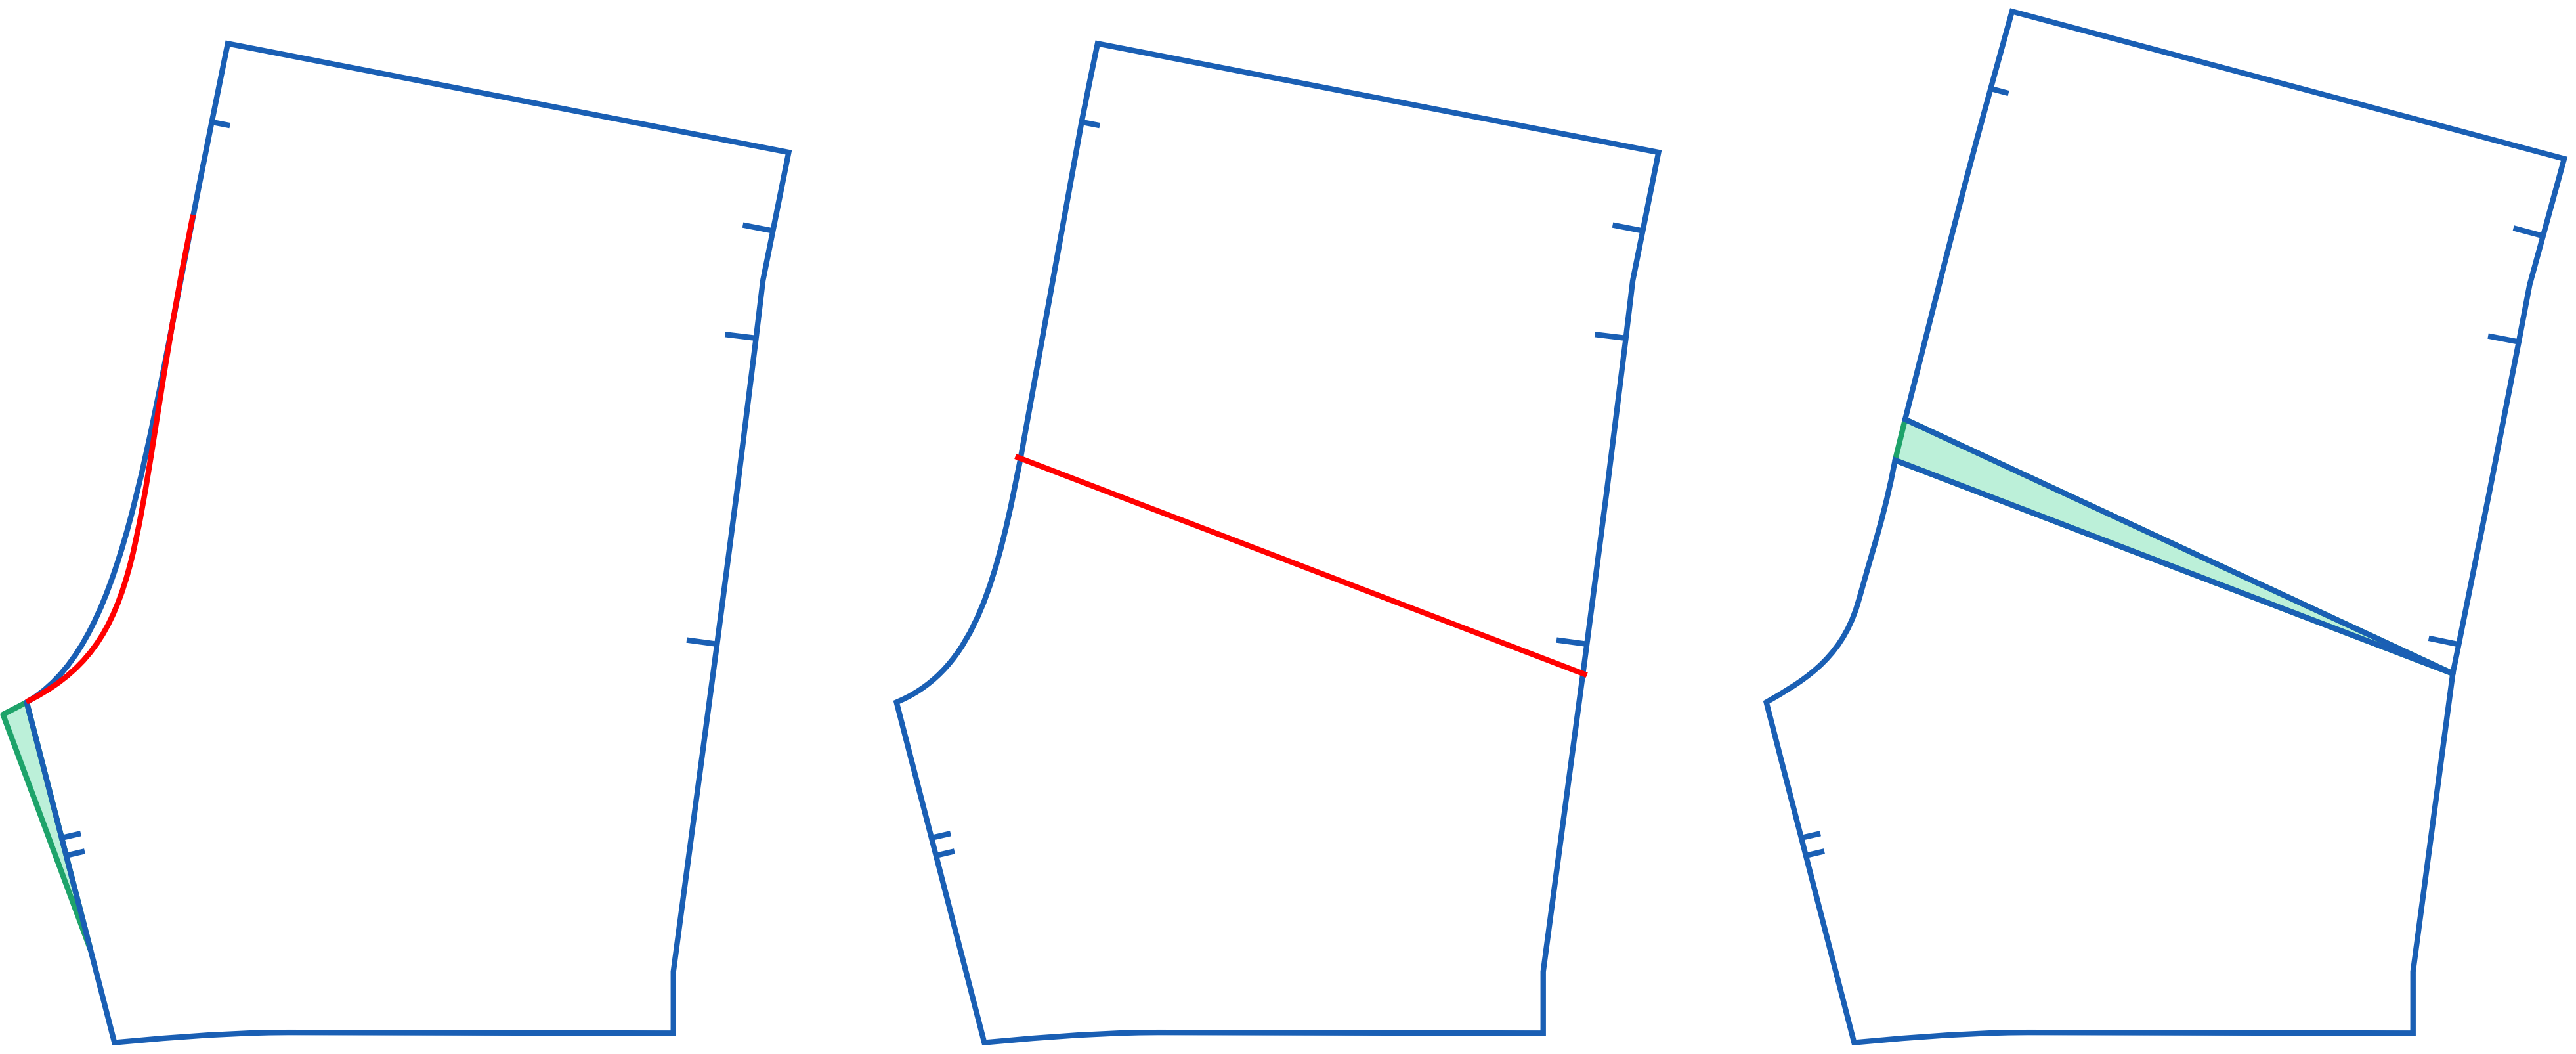
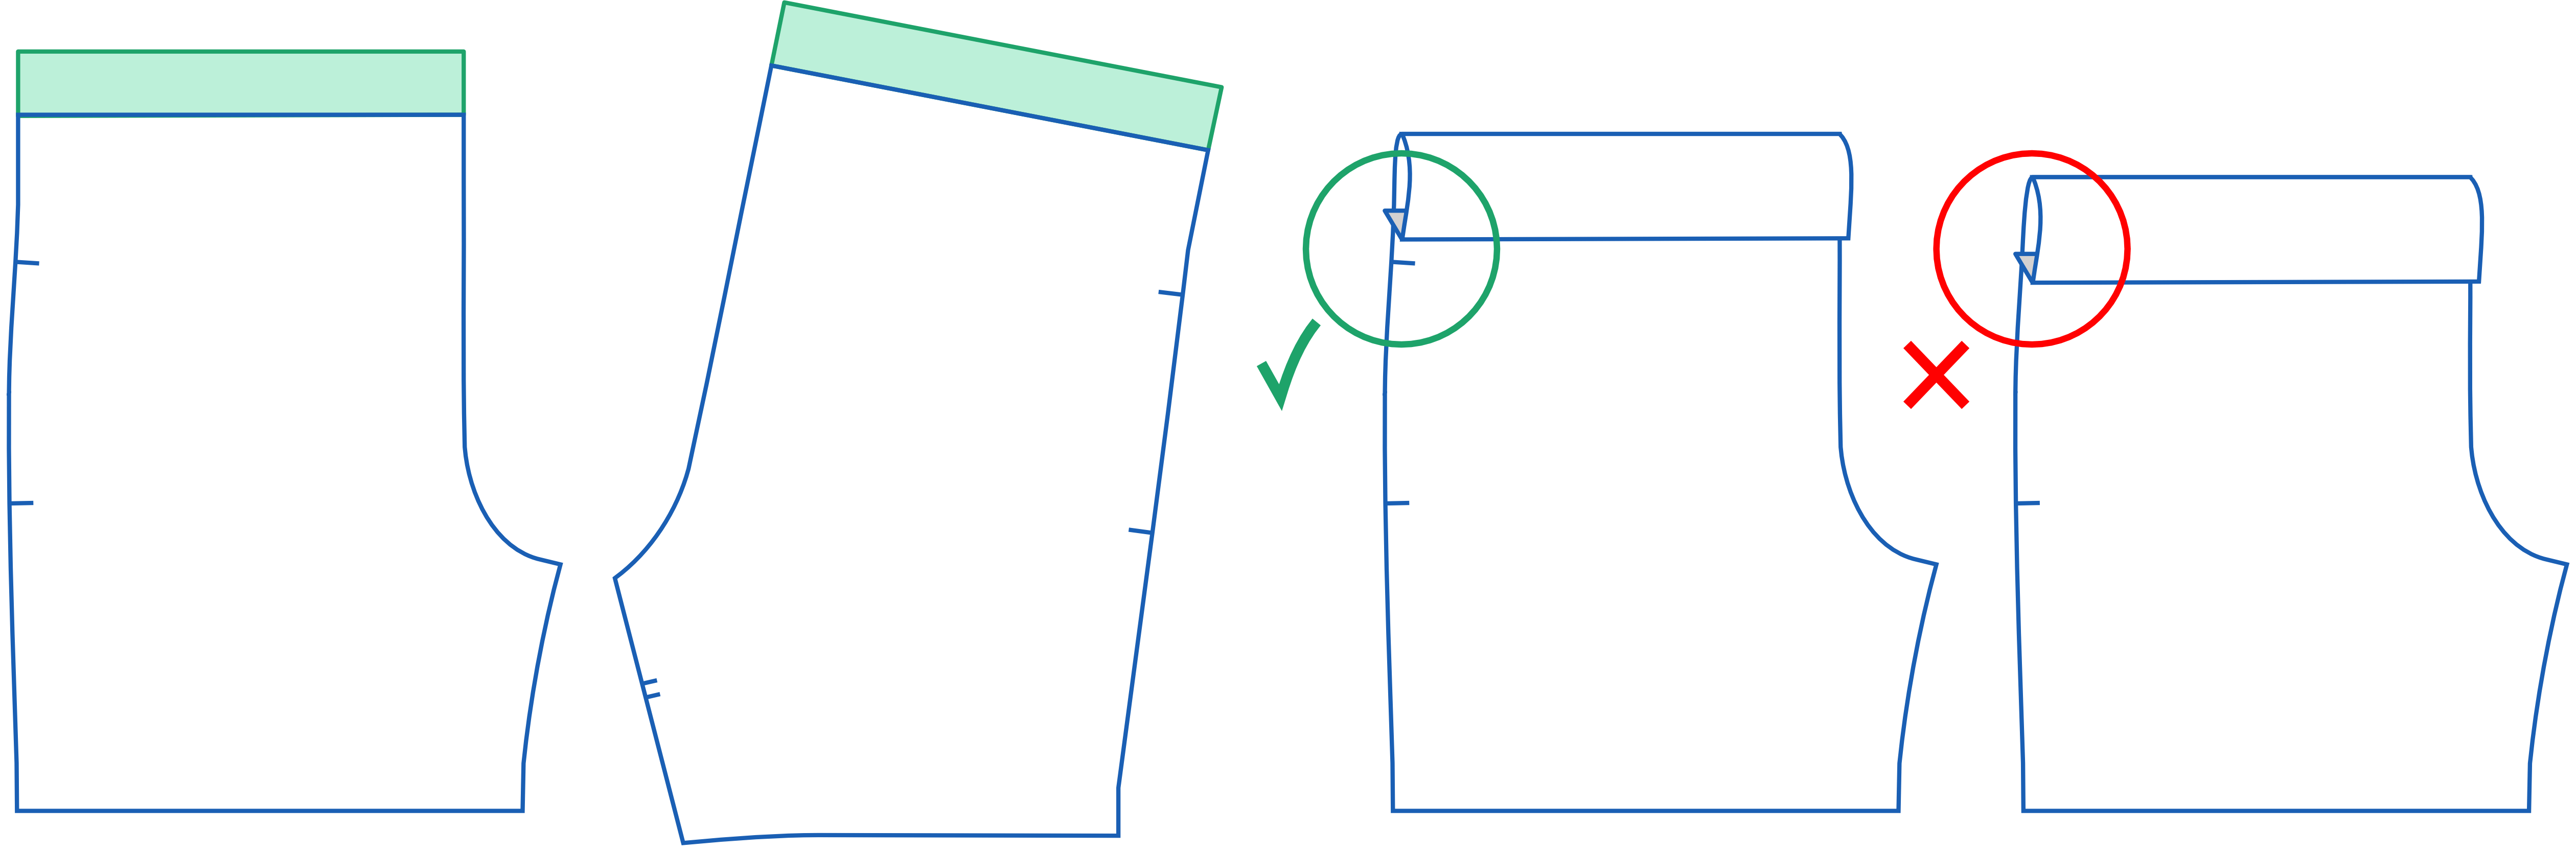
  • Rise Adjustment: Lower or raise the front rise to better match your torso length or comfortable pant-waist height (aka belt line). If lowering the rise by more than ½ inch, consider lowering the inseam pocket notches to prevent the waistband channel from overlapping the pocket opening.
  • Inseam Length: Both 5” and 7” inseams are provided with the pattern. Shorten the inseam for a "Barely Baggies" style or extend for more coverage.
  • Leg Opening Width: Add extra ease for a more relaxed, straight fit.
For basic adjustments, follow the Custom Fit instructions included with the pattern.

Ease in the Thighs

Achieve a relaxed, flared fit for fuller thighs. This adjustment adds mobility for high knee raises or squatting. This alteration flares the leg opening without affecting the fit in the seat or hips.

  • Measurements to Use: Mid-thigh circumference.
  • Important: Compare your measured thigh circumference to the pattern's Finished Garment Leg Opening, noting that inseam adjustments change the location of leg opening. This alteration increases the ease or bagginess around the thigh. Small additions make a big impact so add an amount between your current size and the next larger size.
Steps:
  1. Extend the width of the inseam at BACK and GUSSET. Make even adjustments to each panel to maintain the adjoining seam lengths.
  2. For additional room, increase the leg opening evenly on both FRONT and BACK along the side seams per the Custom Fit instructions in the pattern.

Going further, a split hem can further improve mobility, but modifying the pattern and construction for this feature is beyond the scope of this article.

illustrated pattern adjustment

Relax the fit around the thighs for comfort and mobility.

Fitting Between Sizes

Accommodate a smaller waist while allowing room through the hips, especially if your body measurements span different sizes. This mod reduces bulk around the elastic waistband while maintaining comfortable ease around the hips and thighs.

  • Measurements to Use: Waist circumference and full hip measurement.
  • Important: Ensure the elastic waistband can stretch over your hips for easy on-and-off. This is especially important with low stretch fabric such as woven Supplex Nylon.
Steps:
  1. On the FRONT and BACK pattern pieces, blend from your hip size to a smaller size waist band. Double check the side seam lengths match.
  2. Check that the finished pant-waist circumference of the smaller size can still stretch to fit over your hips.

Example: With a full hip measurement of 38.5" and a pant-waist of 32", the best size selection is based on the full hip. Size 40 (blue) is chosen for hip fit. Checking the Finished Garment table, the pant-waist of size 37 (green) measures 39.5", which is large enough to stretch over 38.5" hips. By blending the waistline of size 40 (blue) down to size 37 (green), the intended ease at the hips is maintained while reducing excess bulk at the waistband for a better fit at the smaller pant-waist.

illustrated pattern alteration and sizing table

Grading down a size to remove bulk in the waistband.

Full Seat Adjustment

Increase ease through the seat to accommodate fuller glutes and prevent waistband pull-down. A well-shaped back crotch curve means a better fit with no wedgies! This mod tailors the shorts for a more full seat without adding bagginess in the waist or thighs.

  • Measurements to Use: Full hip measurement.
  • Important: Small changes have big impact. Large increases in the back crotch curve may result in ill-fitting, saggy shorts. Since extensive fit adjustments may take a few tries to perfect, it’s highly recommended to make a wearable prototype (toile) using fabric that closely matches the weight and stretch of your final garment.
Steps:
  1. On the BACK panel, scoop the back crotch curve slightly to add volume in the seat.
  2. If the shorts feel tight around the hips after this adjustment, extend the back crotch to compensate for the fabric removed from the back crotch curve.
  3. Increase the back rise if additional height is needed for comfort, especially when seated or crouching. Cut and spread BACK to lengthen the back crotch curve, maintaining a right angle at the center back seam to ensure a smooth fit.
illustrated pattern adjustment

Scooping and lengthening the back crotch curve for a better fit in the seat.

Wider Waistband

Improve comfort and increase waistband stability in high-movement sports like running or climbing. A wider waistband may be paired with lowering the front rise to maintain the pant-waist height (aka belt line).

Steps:
  1. Increase the double fold hem allowance to accommodate wider elastic (e.g., 1.25" or 1.5" elastic).
  2. Double-check that the folded hem does not overlap the upper inseam pocket notch.
illustrated pattern adjustment

Increase hem allowance for wider elastic to improve wearing comfort.

Conclusion

With these pattern adjustments, the DIAS shorts can be tailored for a curvier fit. Whether you're adding volume through the seat, widening the leg opening, or tweaking the waistband for comfort, these modifications will help you create a pair of shorts that fits your body perfectly. If you try these mods, be sure to share your results with the LearnMYOG community!