3D Boxed Corners
I'll let you in on the secret to clean crisp 3D boxed corners. It comes down to one simple trick!
 Boxed corners are used when assembling the last panel to a backpack, often the bottom panel.
Last thing anyone wants is to end up with slouchy, wrinkly corners in the final step.
By planning ahead, that last panel sews in perfectly without fuss or seam ripping.
Boxed corners are used when assembling the last panel to a backpack, often the bottom panel.
Last thing anyone wants is to end up with slouchy, wrinkly corners in the final step.
By planning ahead, that last panel sews in perfectly without fuss or seam ripping.
The trick is to always respect your seam allowances.
Here's how it's done.
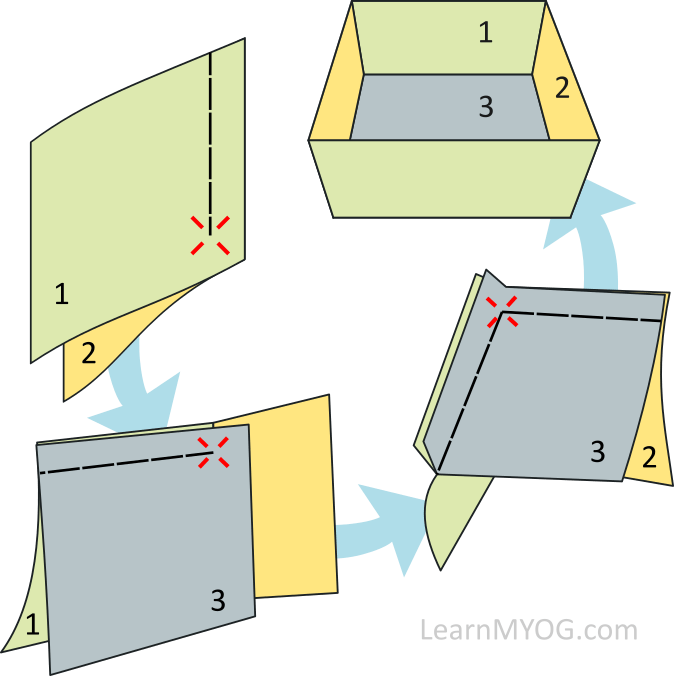
- Sew panels 1 and 2 right sides together (RST) but stop short of the bottom edge, reserving seam allowance for the bottom panel.
- Align panels 1 and 3 seam line and sew RST and again stop short of side seam allowance.
- Align panels 2 and 3 seam line and sew RST. Backtack to lock your seam.
- Go back and reinforce your corners with short backtacks to close any small gaps.
- To reduce seam bulk, trim the corner seam allowance. Be sure to leave ~1/8" (3mm) of seam allowance!
- The boxed corner should have three distinct seam lines and now ready for seam binding